Thursday 13 June 2013

Layer Styles in Photoshop

Layers styles are a HUGE thing in make stuff work in photoshop.

Using the layer styles you are able to add;
  • Drop/Inner Shadows.
  • Gloss.
  • Colour/Gradient Overlays.
  • Glow Effects.
  • Bevel and Emboss.
  • Texture.
With these you can create things like this.


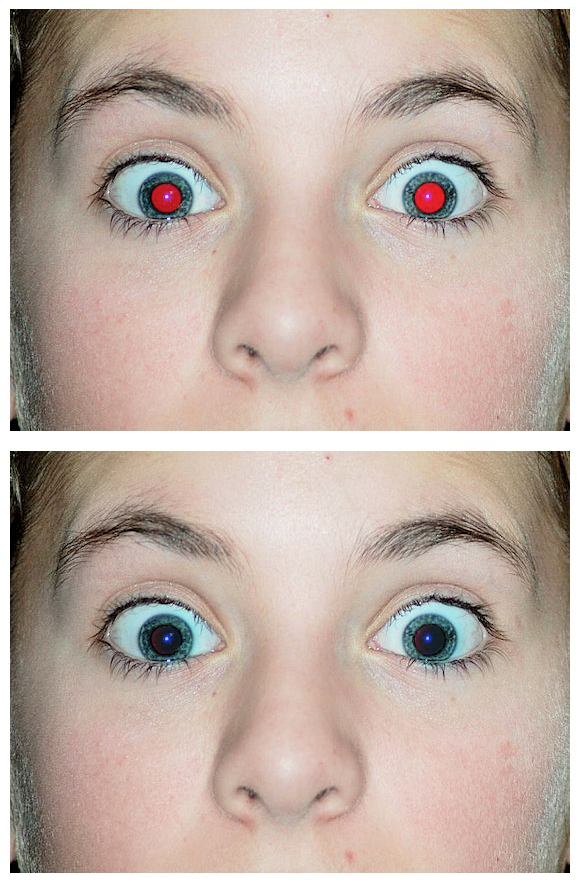
This is what you can achieve with the layer styles, I've used a slight bevel and emboss style for a slight 3d effect and a gradient overlay for the colour along with a drop shadow for some depth of field, I didn't change any of the settings within the styles a lot of this is default apart from the colours.

A link to the tutorial of which will go more in depth is: http://www.tutorial9.net/tutorials/photoshop-tutorials/layer-styles-in-photoshop/

How To Use Filters

With the use of filters, you are able to make a photo seem and feel like something completely else.

The use of renders are rather extensive in the use of a lot of photo manipulation, some of these filters include;
  • Scewing the image.
  • Creating clouds.
  • Lense Flares.
 These can change the mood of an image or even help you create an image from scratch.

http://help.adobe.com/en_US/photoshop/cs/using/WSfd1234e1c4b69f30ea53e41001031ab64-7986a.html

This link goes through the basic of how to use them in more detail.

Wednesday 12 June 2013

Changing an Image to Black and White

Change an image is rather easy, but can be achieved by 2 different techniques, One technique is using an adjustment layer, or just going up to image > Adjustment > Black and White.

With a black and white image, it adds more drama to the image and give it more meaning.

A little hint with black and white, is just normal black and white looks alright, but I've been taught to add a slight tint of blue to certain images and it gives the image a whole different feel.

For example this is the standard image.


This image was the original one I started with, The one below it is of course the black and white image that I created from the original.


There is many tutorials that would go into greater detail than me for this kind of technique, this technique would make a image stand out, with black and white images you do not need to worry about the kind of light when either find or taking the image.

Blending Modes Within Photoshop

With the blending modes, there will help make an image more subtle or harsh.
These modes such as;
  • Overlay.
  • Multiply.
  • Colorburn (Linear, Add)
These modes will help to sharpen an image, e.g.


As you can see this image is rather dull, low lighted, soft image. With a few hits with the blender options using Overlay and Multiply on an adjustment layer it could look like this.


This tutorial I found rather easy, it is a very easy and basic for beginners just starting out.

Sunday 26 May 2013

Diamond Style Tutorial

This tutorial is much more advance than all the other tutorials.

This tutorials uses many different elements such as;
  • Different blend modes.
  • Different filters.
  • Many different brush options.
  • Creating brushes from scratch.
I had trouble with trying to get a nice spacing in between the diamond shaped brushes.


 This is the results of my attempt.

This is the link on this tutorial: http://www.youtube.com/watch?v=XppFKFkud7w

Image Resources and Brushes

This post is just about how to get free images and good brush styles.

Brusheezy: http://www.brusheezy.com/
Render Gallery: http://planetrenders.net/renders/
Fonts: http://www.dafont.com/

With the Render Gallery, You will have to register to this site to be able to view the images in full resolution.

Removing Red Eye From Flash

RED EYE TUTORIAL

With this eye tutorial, you'll be able to save any image from any red eye problems.

You'll learn how to use adjustment layers and blur filters.

This is the results of this tutorial.
This is the results of my attempt.

This is the tutorial link on how to do this: http://www.methodshop.com/gadgets/tutorials/psredeye/